
If you’re not overly familiar with Intercom Aquire, it’s a handy online chat system that allows you to talk directly to your customers and web visitors to help them along their sales journey. It’s a paid-for service, but worth it if you have an online business.
One of the flaws Intercom Aquire has (in my opinion) is that there is no custom setting for office hours. Having Intercom on all the time can help capture new leads, sure, but if your consumers are older in demographic, chatting with nobody in the evening can create frustration with your brand (and even more so if they’re frustrated already). Therefore, this guide was created to help turn Intercom Aquire on or off during your office hours automatically using Google Tag Manager.
Housekeeping Items
Before I get started, I want note that I’ve modified Kathleen Harvey’s code found on the article “Fire Google Analytics on your own Terms” and applied a Daylight Savings Time test thanks to Stack Overflow.
On with the guide. You’re going to need…
- License of Intercom.io Aquire and the basic JavaScript code
- Google Tag Manager properly installed globally on your website
- Two Custom Javascript Files (End of Article)
Setting Up Google Tag Manager
Step 1: Variables
First, we’re going to build two new variables and paste the scripts into Google Tag Manager.
- Log into Google Tag Manager and navigate to your Workspace
- Select Variables from the side menu
- Under User-Defined Variables select the New button
- Click anywhere on the Variable Configuration
- Select Custom JavaScript
- Copy and Paste the JS – Day of Week code into the Custom JavaScript box
- Rename the Untitled Variable to JS – Day of Week and select Save
- Repeat Steps 3-5
- Copy and Paste the JS – Hour of Day code into the Custom JavaScript box
- Rename the Untitled Variable to JS – Hour of Day and select Save
You should now have two new user-defined variables

Step 2: Triggers
2A: Building the Triggers
Now we’re going to build the triggers for your Intercom Office Hours. I’m going to use the example of an office with the following hours:
- Monday = Closed
- Tuesday to Friday = 8:30am – 6:00pm
- Saturday = 10:00am – 5:30pm
- Sunday = 12:00pm – 5:00pm
- Select Triggers from the side menu
- Under Triggers select the New button
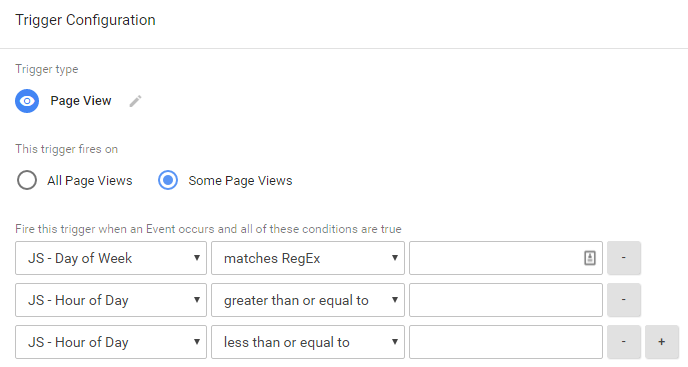
- Click anywhere on the Trigger Configuration
- Select Page View from the Trigger Type menu
- Select the Some Page Views radio button
- Fill out the form by working left to right…
- Dropdown Click Classes and select your variable JS – Day of Week
- Dropdown contains and select matches RegEx
- Skip the form field for now and select the Grey + sign
- Dropdown Click Classes and select your variable JS – Hour of Day
- Dropdown contains and select greater than or equal to
- Skip the form field again and select the Grey + sign on this line
- Dropdown Click Classes and select your variable JS – Hour of Day
- Dropdown contains and select less than or equal to
You should now have a trigger that looks similar to mine below.
2B: Adding Office Hours
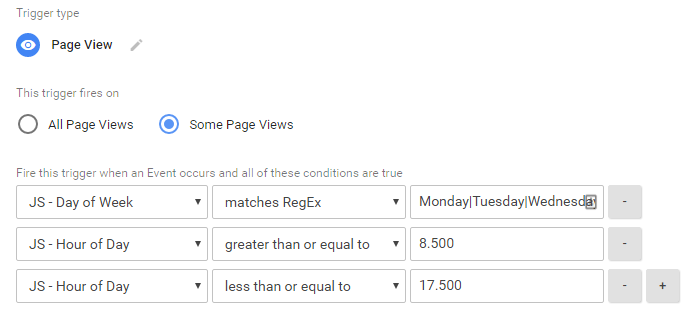
Now we’re going to fill out those form fields with your open office hours and days of the week. We’ll repeat this process for the number of unique days and hours your office is open.
I’m going to split my example into my three unique office hours: Weekdays, Saturday, Sunday. We do not have to worry about days the office is closed – only the days it’s open.
- In the first line (JS – Day of the Week), type all of the days (use full spelling) that your office with the same hours and split each day with the pipe “
|” key.
Monday to Friday:Monday|Tuesday|Wednesday|Thursday|Friday
My Example:Tuesday|Wednesday|Thursday|Friday - In the second line (JS – Hour of Day), type in the decimal time (where 15 mins = 0.25) when your office is open.
My Example: 8:30 am =8.500 - In the third line (JS – Hour of Day), type in the decimal time when your office is closed.
My Example: 5:30 pm =17.500
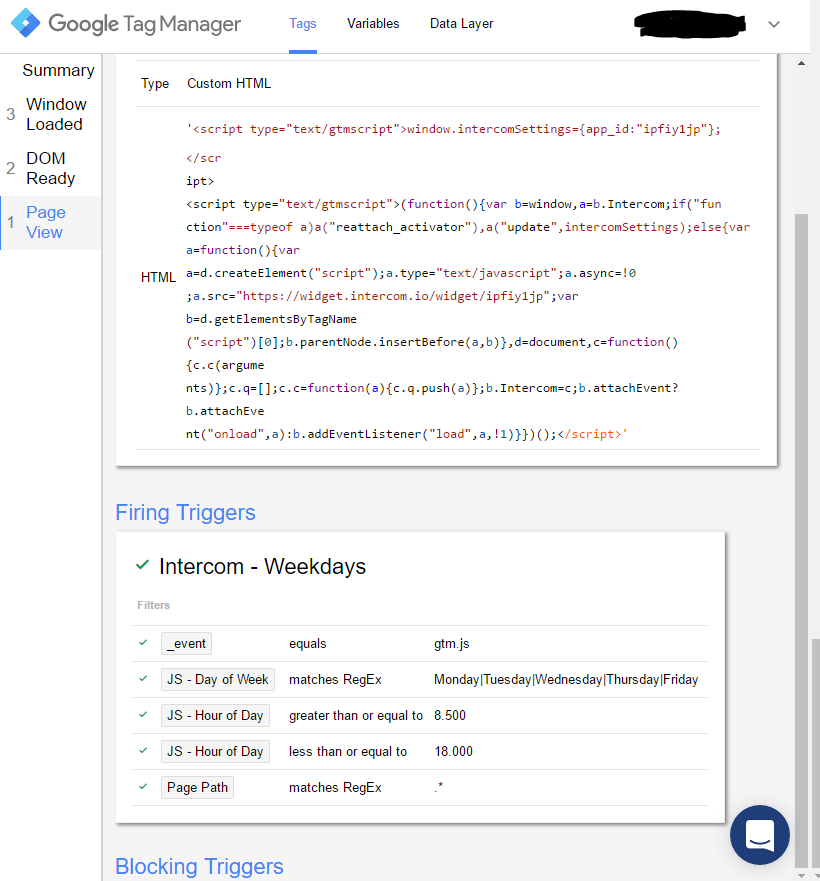
After filling out the fields, you should now have something that looks similar to mine:
2C: Finishing The Triggers
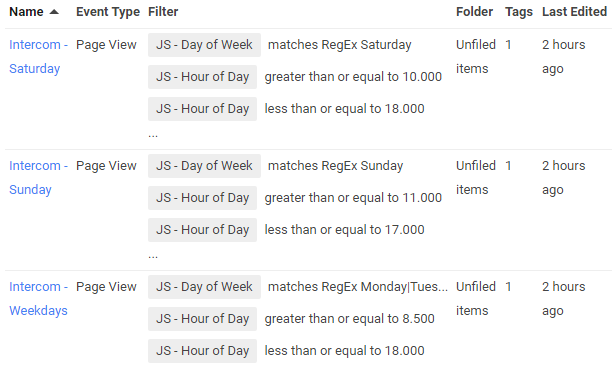
- Rename the Untitled Trigger to Intercom – Weekdays and select Save button
- Build your remaining triggers (I have two more left, Saturday and Sunday)
- Repeat all the steps in Step 2A: Building the Triggers
- Repeat all the steps in Step 2B: Adding Office Hours:
- Day: [
JS - Day of Week] [matches RegEx] [Saturday] - Open: [
JS - Hour of Day] [greater than or equal to] [10.000] - Close: [
JS - Hour of Day] [less than or equal to] [17.500]
- Day: [
When you’re done, you should have three (or four) triggers that look similar to this:
Step 3: Tags
We’re almost done. All we have left now to build are the tags to fire.
- Select Tags from the side menu
- Select the New button
- Click anywhere on the Tag Configuration card
- Select Custom HTML
- Copy and Paste the Intercom Basic Javascript code into the Custom HTML box
- Click anywhere on the Triggering card below the Custom HTML box
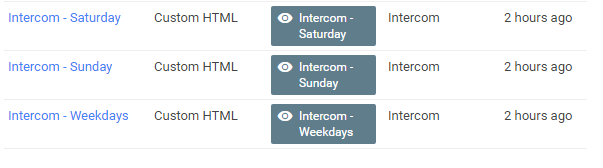
- Select the Intercom – Weekdays trigger you created
- Rename the Untitled Tag to Intercom – Weekdays and select the Save button
- Repeat Steps 2-8 with all of the triggers you created (e.g. Saturday, Sunday, etc.)
You should now have three (or four) new tags like mine:
Step 4: Preview and Debugging
-
- Hit the Grey Down Arrow next to the Publish button and select the Preview button.
- Navigate to your homepage and you should see (or not see) your Intercom button depending on your time of day and office hours.
- Push it live!
Required Scripts
Note: Be sure to update the lines var myTimeZone = -5 and var myTimeZone = -6 with your Time Zone’s Daylight Savings Time [-5] and Standard Time [-6].
JS – Day of Week
function Day() {
  Date.prototype.stdTimezoneOffset = function() {
    var jan = new Date(this.getFullYear(), 0, 1);
    var jul = new Date(this.getFullYear(), 6, 1);
    return Math.max(jan.getTimezoneOffset(), jul.getTimezoneOffset());
  }
  Date.prototype.dst = function() {
    return this.getTimezoneOffset() < this.stdTimezoneOffset();
  }
  var date = new Date();
  if(date.dst()){
    var myTimeZone = -5;
  }
  else {
    var myTimeZone = -6;
  }
  var userTime = new Date();
  var utc = userTime.getTime() + (userTime.getTimezoneOffset() * 60000);
  var currentDate = new Date(utc + (3600000 * myTimeZone));
  var daysOfWeek = new Array(7);
  daysOfWeek[0]=  "Sunday";
  daysOfWeek[1] = "Monday";
  daysOfWeek[2] = "Tuesday";
  daysOfWeek[3] = "Wednesday";
  daysOfWeek[4] = "Thursday";
  daysOfWeek[5] = "Friday";
  daysOfWeek[6] = "Saturday";
  return(daysOfWeek[currentDate.getDay()]);
}
JS – Hour of Day
function Hour(){
  Date.prototype.stdTimezoneOffset = function() {
    var jan = new Date(this.getFullYear(), 0, 1);
    var jul = new Date(this.getFullYear(), 6, 1);
    return Math.max(jan.getTimezoneOffset(), jul.getTimezoneOffset());
  }
  Date.prototype.dst = function() {
    return this.getTimezoneOffset() < this.stdTimezoneOffset();
  }
  var date = new Date();
  if(date.dst()){
    var myTimeZone = -5;
  }
  else {
    var myTimeZone = -6;
  }
    var userTime = new Date();
    var currentHour = (userTime.getTime()%(24*60*60*1000))/(60*60*1000)+ myTimeZone;
    if (currentHour < 0){
        return (currentHour+24);
        // console.log(currentHour+24);
    } else {
        return (currentHour);
        // console.log(currentHour);
    }
}
Sources
https://www.lunametrics.com/blog/2016/09/20/fire-gtm-tags-your-schedule/
https://stackoverflow.com/questions/11887934/how-to-check-if-the-dst-daylight-saving-time-is-in-effect-and-if-it-is-whats